

The best way to run Camunda 8 on your local machine is using Kind. This page walks through the steps to set up a Kubernetes cluster on your local machine. If you have questions about any of the steps or get stuck, don't hesitate to click the Ask a Question button at the bottom right and we can set up a Zoom to help you through the problem.
Install Docker Desktop
To run Docker on your local machine, install Docker Desktop following the instructions here.
Install Brew
Brew makes it easiest to install things on macOS. If you are running Windows, you can try Chocolatey. Run this command to install brew:
/bin/bash -c "$(curl -fsSL https://raw.githubusercontent.com/Homebrew/install/HEAD/install.sh)"
Install kubectl
The command line tool for Kubernetes is kubectl. Run the following command to install it on macOS (instructions for other operating systems are here):
brew install kubectl
Install helm
Helm is the package manager for Kubernetes. Run the following command to install it on macOS (instructions for other operating systems are here):
brew install helm
Install kind
Kind is a tool for running local Kubernetes clusters. Run the following command to install it on macOS (instructions for other operating systems are here):
brew install kind
Create a Kind Cluster
By default, a kind cluster only exposes a single port. To make it easy to access apps running in your cluster, you can expose additional ports on the kind cluster with a configuration file by running this command:
curl -fsSL https://raw.githubusercontent.com/apexdesigner/apex-cluster-manager/main/kind/Cluster.yaml | kind create cluster --config -
Install Camunda
Add the Camunda Helm charts repository:
helm repo add camunda https://helm.camunda.io
The Camunda Helm Repository has a values file that configures Camunda 8 to run nicely on kind cluster. That configuration includes Task List and Operate. These enterprise components are not needed with Apex Designer apps because the Camunda 8 Library includes task management and process administration capabilities. To save resources, install Camunda with an additional configuration file:
helm install camunda camunda/camunda-platform \
  -f https://raw.githubusercontent.com/camunda/camunda-platform-helm/main/kind/camunda-platform-core-kind-values.yaml \
  -f https://raw.githubusercontent.com/apexdesigner/apex-cluster-manager/main/kind/examples/camunda.values.yaml
Install Postgres
Add the Bitnami Helm charts repository:
helm repo add bitnami https://charts.bitnami.com/bitnami
To expose Postgres and make it accessible on your machine, install it with a configuration file that exposes it on port 30000:
helm install postgres bitnami/postgresql \
  -f https://raw.githubusercontent.com/apexdesigner/apex-cluster-manager/main/kind/examples/postgres.values.yaml
It will take a while before all the pods are running. You can use this command to get the list of pods and their statuses and watch for updates:
kubectl get pods -w
It should looks something like this:
NAME                                     READY   STATUS    RESTARTS   AGE
camunda-zeebe-0                          1/1     Running   0          152m
camunda-zeebe-gateway-7c89dff757-qv8jl   1/1     Running   0          152m
elasticsearch-master-0                   1/1     Running   0          152m
postgres-postgresql-0                    1/1     Running   0          140m
A password was automatically generated when Postgres was installed. To get that password, run this command:
kubectl get secret --namespace default postgres-postgresql -o jsonpath="{.data.postgres-password}" | base64 -d
You can now access postgres at localhost:30000 with user postgres and the password returned in the previous step.
Installing an App Manager
In Apex Designer, go to Settings + App Managers and create a local app manager for your app by selecting this option:
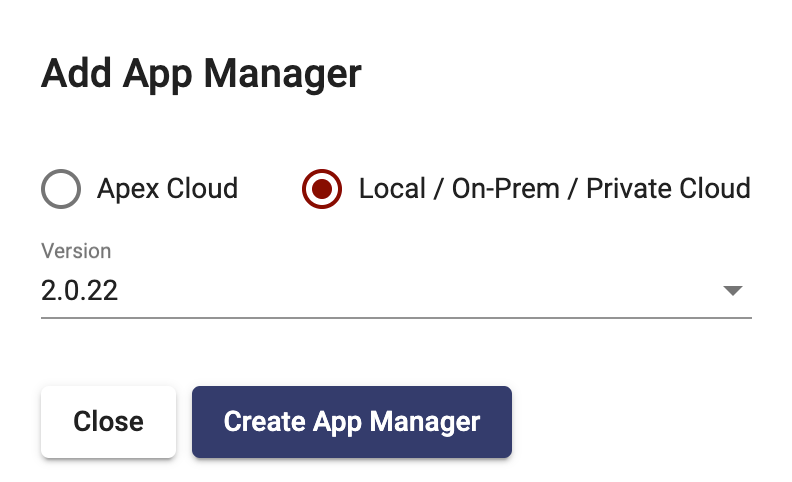
Set the port number for your app manager to 30001 (or anything up to 30009 - these are the port numbers that are configured in Auth0 for the apexdesigner.app domain):
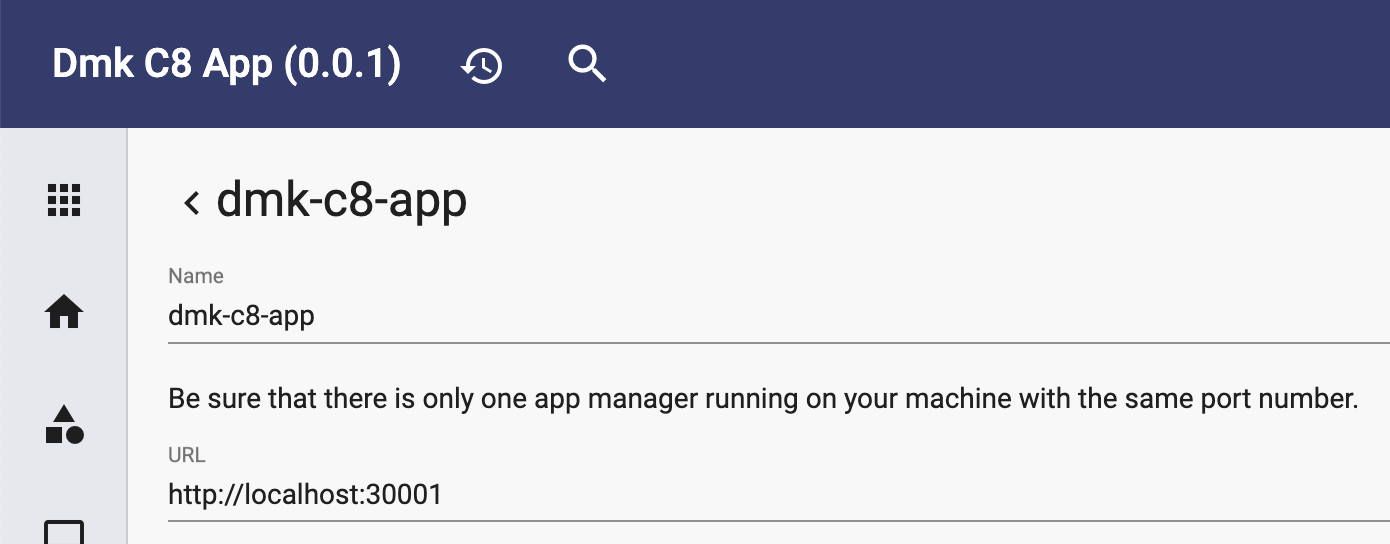
Create a manifest file for your app manager. This is my example named dmk-c8-app.yaml. All of the bold text will need to be updated. You can find the values on the app manager page for your app. The zeebeDeploymentPrefix environment variable separates the process definitions and jobs of this app from other apps you deploy to the same Zeebe instance. The exact value does not matter. Just make sure it is unique within the Zeebe instance.
---
apiVersion: apps/v1
kind: Deployment
metadata:
  labels:
    app.kubernetes.io/component: app-manager
    app.kubernetes.io/instance: dmk-c8-app
    app.kubernetes.io/managed-by: apex-designer
    app.kubernetes.io/name: app-manager
    app.kubernetes.io/version: 2.0.22
    environment: production
  name: dmk-c8-app
spec:
  replicas: 1
  selector:
    matchLabels:
      app.kubernetes.io/instance: dmk-c8-app
      app.kubernetes.io/name: app-manager
  strategy:
    type: Recreate
  template:
    metadata:
      labels:
        app.kubernetes.io/component: app-manager
        app.kubernetes.io/instance: dmk-c8-app
        app.kubernetes.io/managed-by: apex-designer
        app.kubernetes.io/name: app-manager
        app.kubernetes.io/version: 2.0.22
        environment: production
      name: dmk-c8-app
    spec:
      containers:
        - env:
            - name: projectId
              value: "6528"
            - name: apexDesignerURL
              value: https://app.apexdesigner.io
            - name: clientSideApexDesignerURL
              value: https://app.apexdesigner.io
            - name: skipSSLRedirect
              value: "true"
            - name: adminEmails
              value: david.knapp@apexbpm.com
            - name: apexDesignerAuth0Audience
              value: https://apexdesigner.io
            - name: apexDesignerAuth0Issuer
              value: https://login.apexdesigner.io/
            - name: syncApiKey
              value: sfgaasdfs
            - name: appUrl
              value: https://localhost:30001
            - name: databaseUrl
              value: postgres://postgres:PAJ7dnZWi0@postgres-postgresql:5432/dmk-c8-app
            - name: databaseSSL
              value: 'false'
            - name: elasticsearchConfiguration
              value: '{ "node": "http://elasticsearch-master-headless:9200" }'
            - name: ZEEBE_ADDRESS
              value: 'http://camunda-zeebe-gateway:26500'
            - name: zeebeDeploymentPrefix
              value: DCA
          image: apexbpm/app-manager:2.0.22
          imagePullPolicy: IfNotPresent
          name: dmk-c8-app
          ports:
            - containerPort: 3000
              protocol: TCP
          volumeMounts:
            - mountPath: /usr/src/app/app
              name: persistent-storage
      volumes:
        - name: persistent-storage
          persistentVolumeClaim:
            claimName: dmk-c8-app
---
apiVersion: v1
kind: Service
metadata:
  labels:
    app.kubernetes.io/component: app-manager
    app.kubernetes.io/instance: dmk-c8-app
    app.kubernetes.io/managed-by: apex-designer
    app.kubernetes.io/name: app-manager
    app.kubernetes.io/version: 2.0.22
    environment: production
  name: dmk-c8-app
spec:
  type: NodePort
  ports:
    - port: 80
      targetPort: 3000
      nodePort: 30001
  selector:
    app.kubernetes.io/instance: dmk-c8-app
---
apiVersion: v1
kind: PersistentVolumeClaim
metadata:
  labels:
    app.kubernetes.io/component: app-manager
    app.kubernetes.io/instance: dmk-c8-app
    app.kubernetes.io/managed-by: apex-designer
    app.kubernetes.io/name: app-manager
    app.kubernetes.io/version: 2.0.22
    environment: production
  name: dmk-c8-app
spec:
  accessModes: [ "ReadWriteOnce" ]
  storageClassName: "standard"
  resources:
    requests:
      storage: 15Gi
Install your app manager using this command:
kubectl apply -f dmk-c8-app.yaml
The first install will take at least several minutes because it needs to download the App Manager image. Subsequent installations of Using this command to wait for the pods to all be running:
kubectl get pods -w
You should now be able to launch your app manager using http://localhost:30001/apexDesigner/status.